The Rules of Putting
Grip
As far as a conventional putting grip goes, rule No. 1 is that the hands should oppose each other (as if palms were facing each other) because we don’t want either side fighting the other.
It’s notable that Tiger Woods recently regained his putting prowess after Steve Stricker pointed out that the stronger left hand grip Tiger uses for his full swing had crept into his putting. Once Tiger neutralized his grip so his hands were facing each other, he started putting lights out again. Rule No. 2 is that the club should rest in the fingers of both hands with minimal tension. A phrase I use with my juniors is “hot dog in the bun.” This will have a few positive effects — it will prevent your rear hand (the right hand for right handed golfers) from rolling over the front during the stroke, which can easily happen when you hold the grip in your lifeline. It will also get the shaft of the putter to look like an extension of your forearms (when viewed from behind) — a key to a consistent stroke. What many golfers don’t know is that good posture at address can greatly reduce the effect of the rear hand in the stroke, but I’ll get to that in a moment. So, to summarize, the keys to a conventional putting grip are hands facing each other and grip cradled in the fingers with minimal tension.
Alignment
There are great players who have not lined their body up parallel to the target line when they putted. Jack Nicklaus used an open stance and Jim Furyk stands closed to the target line. The point I try to make to my students (as kindly as possible) is that none of them have the combination of a PGA Tour player’s long-term muscle memory, practice time and physical gifts. Most amateurs need a simple and neutral putting stance because that makes it easy to repeat under pressure with a limited practice schedule.
Standing parallel to the target line with your eyes and shoulders parallel sets you up to make a simple and repeatable stroke without any manipulation. The real alignment key is that the putter absolutely must be aimed at your intended target because face angle, not path, exerts the majority of control over the direction the ball travels.
The first step is to figure out whether you are in fact aiming at your target. The first thing I do with my students is measure their alignment using a device called the Triangulator. There are a variety of laser aiming devices that are much more expensive, but the Triangulator does the job just as well. The vast majority of players I work with, including low handicap amateurs and a few professionals, aimed substantially wide of their target on a ten foot putt when I first measured them.
Once you establish what your aiming fault is, you can begin working to correct the alignment of your body and the club face. I use a SeeMore putter and encourage my students to do the same because they are the only putters that help a golfer learn to consistently line up the club and their body while they practice, and keep them on track while they play. So, if you wanted two catch phrases for the keys to putting alignment, they are “putter face aimed at the intended target” and “eyes, shoulders and feet parallel to the target line.”
Posture
Good posture is probably the most important element of great putting. In the mid to late 20th century, grass on greens was longer and professionals and amateurs had to give the ball a pop with their wrists to get it out of its depression on the green and rolling on the putting surface. Advances in technology created faster and firmer putting surfaces and rendered that method useless. To make the consistently smooth stroke required on modern greens, we have to be able to rotate our shoulders around our spine, and to do that our shoulders have to be in line, not slouched. The sensation should be that the muscles between your shoulder blades are pulling them back so your shoulders are straight.
The more a player slouches their shoulders, the greater the chance the small muscles in their forearms, wrists and hands will take over the stroke because the shoulders can’t turn, especially under pressure. Excellent posture is what almost all of the great putters currently on Tour share. Along with changing his grip, Tiger correcting his posture was the thing he attributed to his putting renaissance this season. Tiger is the model of good putting posture and we should all emulate him at address. For simplicity’s sake, the catch phrase for posture should be “shoulders back, 45 degree bend at the waist.” You may find that you need a longer putter after adopting this posture.
Ball Position
Conventional wisdom in putting has been that the ball should be positioned off of the heel of the foot closest to the target — the left foot for a right-handed player. The problem with this is that if the player’s posture is good (as described above) and he is standing with his shoulders aimed at the target, his hands should hang naturally, straight down from his sternum. If the ball is positioned off of his front foot, the player has to make a compensation to get his hands over the ball at address. To make a smooth stroke that is based on shoulder rotation and not hand manipulation, the putter should be in the center of your stance and the ball just to the left. The result is a solid, relaxed and neutral set up that is easy to repeat and because it is free of manipulation. Your ball position key should be “ball just left of center, eyes over the heel of the putter.”
A Few Drills
Practice drills serve two purposes — there are those that help a player groove technique, and there are those that help him learn how to perform by simulating the pressure of playing situations during practice. Both are useful, but you have to know what you’re trying to accomplish before you decide how to spend your time.
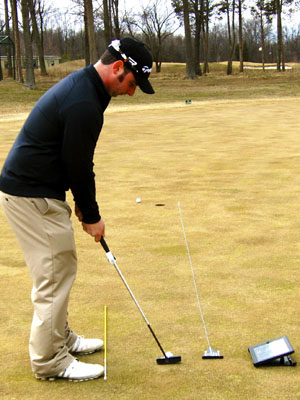
One of my favorite drills is to have a student practice rolling a ball down a metal yardstick to a cup or target. The best part of the drill is that you can use the back edge of the ruler to confirm proper aim and alignment before you hit the putt. You can also use it to get visual feedback that you are making a good arc practice stroke before hitting a putt. Using a string or a chalk line (above or below) also helps identify and confirm proper alignment.


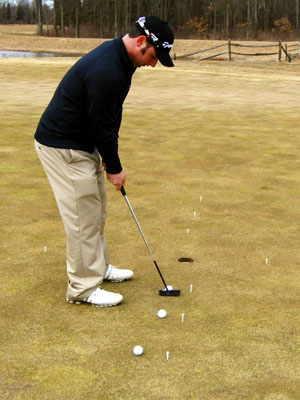
The ladder drill (above left) is probably my favorite pressure simulation drill. If you want to learn how to make short putts when they matter, being able to make it around a circle of 12 tees from varying lengths, holing putts of different speed and breaks is the best way to test your nerve. You can also adjust the length of the putts or set them up on more severe slopes to increase the difficulty.
A Pair of Trained Eyes
I hope these fundamental and drills will lead you toward more effective practice. Remember to check in with your local putting teacher whenever you need help. Putting may not seem as technical as the full swing, but as I think I demonstrated this piece and in Part 1, putting is more important to your overall scoring than any other part of your game and we all need a pair of trained eyes to help us accomplish those things as often as possible.